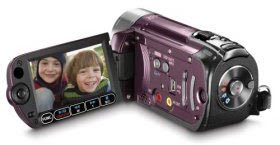
 I finally purchased a Canon FS100 Camcorder (just like the FS10 and FS11, but without any built-in memory) for making my famous DIY videos. Great little camera, very happy with it so far.
I found it very convenient to be able to transfer the recorded files over from the SD media to my PC, however, getting the resulting .MOD files (a flavor of MPEG2) into Adobe Premiere Pro proved to be a challenging experience.
Throughout this tutorial, I'm going to assume that you are recording your videos in wide-screen mode in the highest quality setting.
Step 0: Enable Adobe Premiere Pro CS3 to read MOD files
Copy the file ad2ac3dec.dll to the application root of Adobe Premiere Pro CS3.
Step 1: Get the files off the SD media.
Create a folder where you would like to copy your video files (give this folder the name of your project, in this example it will be SampleProject). Simply use either the supplied USB cable to connect the camera to the computer and browse it like an external drive or use a flash memory card reader to read the SD memory card directly.
The video files on the Canon FS series are stored in SD_VIDEO/PRGXXX (in my case it's PRG001), so we want to copy or move the PRG001 folder to the SampleProject folder we created earlier. From now on when I mention the PRG001 folder, I am referring to the local copy, not the copy on the SD card.
Step 2: Rename the MOD files to M2V files
Open the PRG001 folder and copy its address:
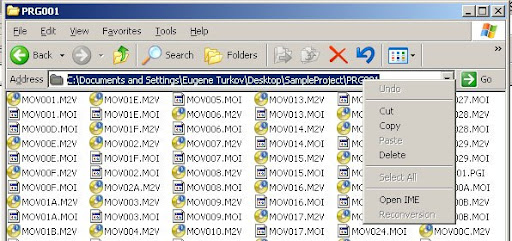
Next, click Start, run, and type in cmd to open up the command prompt application:
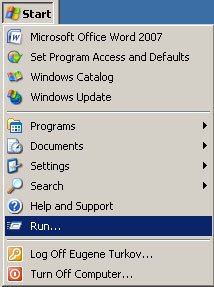
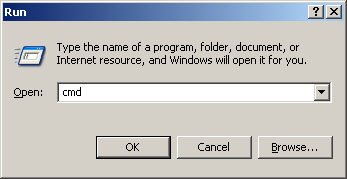
After hitting "OK," the cmd appliation will start. Type in the command cd (change directory) then type a space, right click on the cmd application and select the "paste" option and hit the ENTER key; see below:
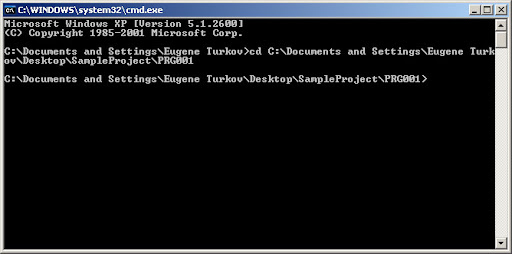
then type "rename *.MOD *.M2V" to rename all of the MOD files to M2V files:
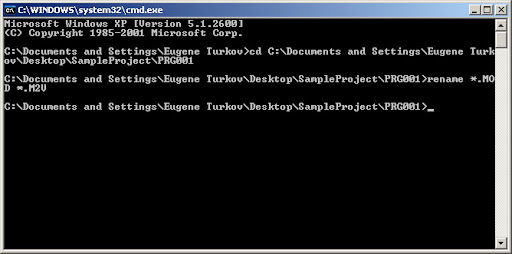
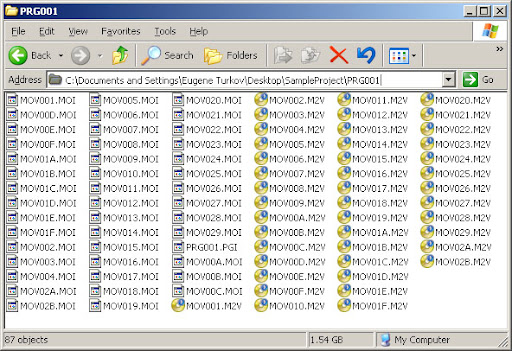
Confirm that your PRG folder now contains M2V files instead of MOD files:
Step 3: Create A New Project
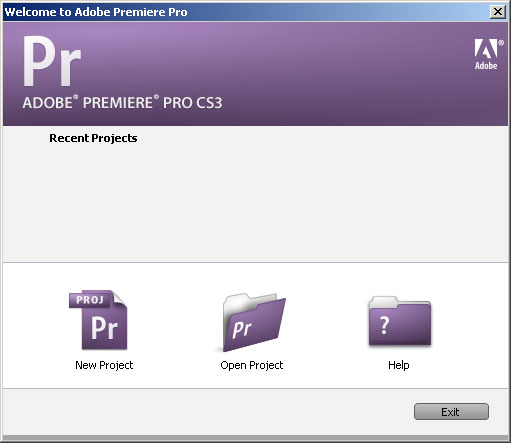
Open Adobe Premiere and select New Project:
Next, select the preset DV - NTSC -> Widescreen 48kHz
For the location field, choose the parent of the PRG folder, and for the name field, use the same name as the parent folder (I also prefer to use a lower case letter as the first letter). Click "OK" to create the project.
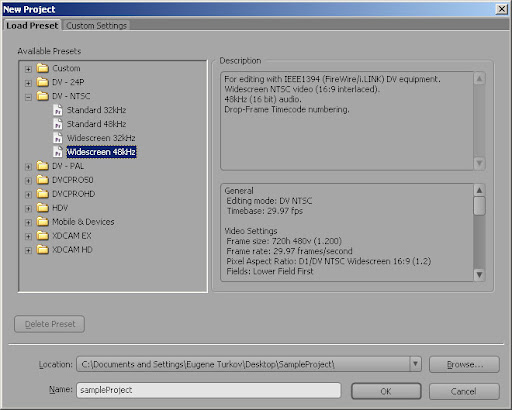
Step 4: Import the Video Files
Select File -> Import and browse to the PRG folder. Sort the files by the modified property so that MOV001.M2V is at the top:
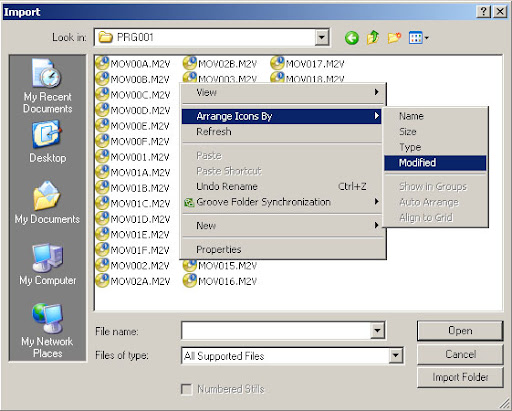
Note that in the above screen shot, the files haven't been sorted yet.
After you have properly sorted the files, select the very last file, then hold the SHIFT key and click on the very first file. The files will be imported correctly now. Just click "OK" to import the files.

Step 5:
After premiere has finished pre-processing the files, select all of the newly imported files (you can use the same SHIFT + CLICK method as above), right click any one of the selected video files, and choose Interpret Footage...
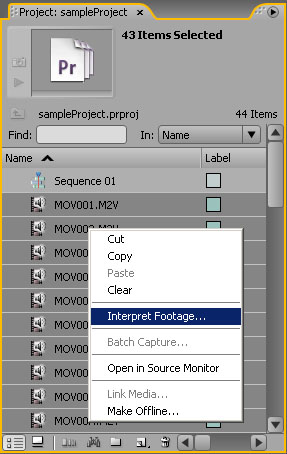
When the Interpret Footage dialog opens, change the Pixel Aspect Ratio to D1/DV NTSC Widescreen 16:9 (1.2) and click "OK"
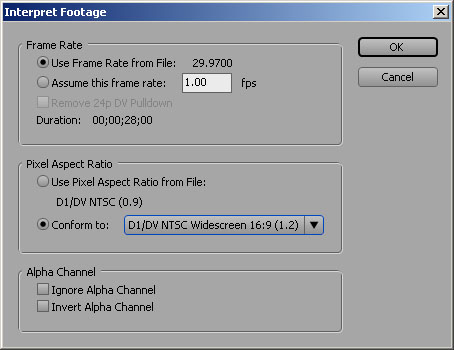
Congratulations, you are now free to edit & export your video in 16:9 widescreen mode!
Thanks Eugene, it worked without any fuss.
ReplyDelete;)
ReplyDeletemy adobe cs3 no open m2v files Why a copy file in root on dir adobe cs3
ReplyDeleteThis comment has been removed by the author.
ReplyDeleteBrilliant -- that dll did the trick! (And I had it in Encore all the time and never knew.)
ReplyDeleteI just wish I'd seen your post before spending $100 to upgrade Cyberlink's PowerDirector. What a fracking joke that software is. Who is it meant for, anyway? Twelve year olds?
milosmaka said "my adobe cs3 no open m2v files Why a copy file in root on dir adobe cs3" sorry for deleting your post on accident, I was trying to figure out how to reply to your post directly... Anyways, could you be more clear with your question please, I don't quite understand what you're asking.
ReplyDeletehi, my adobe premier cs3 doesnt open m2v files, i copied file .dll to root and doesnt open again.
ReplyDeletewhat is problem
Thank you
Well first make sure you are copying the right file to the right place. Second, when you say it doesn't open, what exactly happens when you try to open one?
ReplyDeletefile format not supported. i copy dll file on the dir adobe on the root.
ReplyDeletehmm.. perhaps you could try the process again. Even consider re-installing Premiere Pro CS3.. you are trying to use Premiere Pro CS3, right?
ReplyDeleteIf you still can't get it to work, I would go to the adobe support forums and ask there, they are very helpful. If you figure out the solution to your problem, please come back and post a comment to let us know the solution.
Thanks!
AWESOME!! Thanks heaps, this saved hours of converting to AVI.
ReplyDeleteFollow the instructions closely and you won't have a problem.
Be sure to close Premiere and restart to make sure the new dll is loaded.
Cheers,
Dave
Maybe this is a bit of a null question, but I'm wondering if this process will work with Premier Pro 2.0 (couldn't quite afford anything newer) before I go ahead and try and, possible, screw something up.
ReplyDeletehey folks, my premiere pro cs3 won't read the m2v files =\ dunno what the prob is
ReplyDeletenvm lol i reinstalled like you said and everything works fine... thanks for a great guide!
ReplyDeleteThanks for that one!
ReplyDeletesaved my life :)
M
Thank you for the above. I was able to convert the files and read them in Premiere Pro CS3, but its not importing the audio. Did I do something wrong?
ReplyDeleteAn addendum to my above question. I was able to import the m2v files into my XP PPRO CS3, but my Vista PPRO CS3 only imports the video file and doesn't see an audio file. Does anyone know why?
ReplyDeleteCould be you don't have the right codecs installed under vista. Try installing the AC3 audio codec and see if that helps...
ReplyDeleteHi! Eugene, Thanks for the detailed explanation. Could you please elaborate the statement "Copy the file ad2ac3dec.dll to the application root of Adobe Premiere Pro CS3." I already downloaded the file in my PC. Please tell me step by step how to copy it to the application root of Adobe Premiere Pro CS3. I'm slightly confused
ReplyDeleteshankar, which operating system are you using? If you are using windows, you'll need to copy the file by either right-clicking on it and saying "copy" or by pressing the key combination ctrl+c, or by choosing the copy option from the File menu. After the file has been copied to the clipboard, paste the file using similar methods into the directory "C:\Program Files\Adobe\Adobe Premiere Pro CS3\"
ReplyDeleteThis directory may have a different name/address on your machine, but this is the general idea.
hello Eugene..
ReplyDeletehow about the step-by-step for Adobe Premiere Pro CS3 for Mac?
What kind of file should i copy to the "root-directory"? Thanks
buy me a copy of CS3 for the MAC and I'll do it :)
ReplyDeleteHere is another approach that might be useful.
ReplyDeleteWhat you need to do is;
1. Copy this file from Adobe Encore CS3 to the Adobe Premiere CS3 folder
ad2ac3dec.dll
2. Then I use Adobe Bridge Tools menu Batch Rename choose Copy or Move select only the .mod
files and rename to .mpg files in the new location on your hardrive.
3. Then just import straight into Premiere CS3
Once everything is conformed etc you'll have editable .mpg's with sound.
Hi thanks for a great guide. I have renamed my files to m2v and copied the file.
ReplyDeleteI get the clips imported and looking great in Adobe Premiere Pro Cs 3, but only sound for about 15 seconds in each clip.
When I watch the clips in media player, all of the sound is there.
do u have any idea how i can get all the sound in premiere pro?
thanks
Hello Dude,
ReplyDeleteI was very busy in the last couple of days, I couldn't check ur blog. Anyway, my OS is Windows XP service Pack 2 and I've installed Adobe Premeir Pro in my PC. I did everything step by step as told by you but unfortunately I'm unable to import .M2V clips in my project. I'm getting an error message "Unsupported audio rate in file". Please advise me what to do (shanku.sarkar@gmail.com). I'm ready to re-install Adobe Premeier or Win XP if required. All vido clips of my f****** 60 GB JVC camcorder are still un-edited and I'm running out of patience. please HELP!! Thanks in advance.
Thank you Thank You THANK YOU!
ReplyDeleteI tried several methods and converter software, but finally this methods works! Got the same camera and finally can convert my stuff in Premiere.
awesome this totally worked. I knew I had to change the ext. from .mod to mpg or m2v but I kept getting only the video and not the audio into premier. untill I copied the .dll file. now it worked. one question, when opening with bridge, I cant preview m2v files, but I can preview the .mpg extensions. any areason why? it would be nice to be able to preview it. help!
ReplyDeleteEugene, UR a godsend - I've been pulling my hair out why i couldn't get the audio to work in Premiere. thanks mate!
ReplyDeleteThank you sooo much for posting this!! You solved everything.
ReplyDeleteYou're very welcome... I know what it feels like to be frustrated with these things - glad I could help! :)
ReplyDeletethanks so much! tried for ages to find a way to do it, even the engineers at uni couldnt work it out!
ReplyDeletelifesaver!
X
Ineed help ! , in windows vista the command "rename *.MOD *.M2V" does not work, is there another way to do this ?
ReplyDeleteTHANK YOU !!! you saved hours of work !!!
ReplyDeleteThanks E, managed to get this working using info from http://dotwhat.net/mod/2483/ and this site. Cheers
ReplyDeleteThat's awesome! Thanks Turkov!
ReplyDeleteWould u please describe the mechanic behind the ad2ac3dec.dll file a bit more?
Coz i'm an user of a very old version of Adobe Premiere Pro 7.0 and wonder if the method u mentioned works well with that.
Andrew, DLL stands for Dynamic Link Library, which basically means that it is a library containing code. I'm assuming that this library contains code that can read a compatible format into the Adobe Product. I will try to find out exactly from my friends at Adobe.
ReplyDeleteEugene, OMFG you are the one!
ReplyDeleteThank you so much!..
Isn't it possible to make a batch file that does alle the cmd work.. :)
That would be greeeeat!
And btw, its also .mod files on a panasonic SDR-H50 camcorder..
And why the heck doesn't they just make the camcorders so the fileformat is something simple like .avi og .mpeg! ME NO LIKE!!!.. good old times with miniDV tapes!! <3
Eturkov, I've tried the above method in adobe premiere pro 7.0 but it doesn't work. "Unsupported audio rate in file" still said. May be my Premiere doesn't read the ad2ac3dec.dll ?
ReplyDeleteBefore I go running out to buy the new camera I want, is this going to work on Vista? Previous comments seem to lean towards no, it won't.
ReplyDeleteWorked perfectly! Copied .dll, imported into premier cs3, and never got even the interpolation request. Thanks A lot man!
ReplyDeleteHave copied this into CS4, but no audio?? What did I do wrong??
ReplyDelete"Have copied this into CS4, but no audio?? What did I do wrong??"
ReplyDeletePerhaps this technique doesn't quite work when using CS4. Try visiting the Adobe forums to get an answer to your question.
You are one bad sob, Eugene!!!
ReplyDeleteThank you so much!! Works great with my CS3.
Eugene, will this work with Premiere Elements 7?
ReplyDeleteMax, I'm not sure... but if you try it and it works, please let us know :)
ReplyDeleteHi Eugene
ReplyDeleteGreat Job
Thanks VERY Much
macc
Excellent work - Saved me hrs of converting. Explanation was perfect.
ReplyDeleteTHANKYOU!
I have adobe premiere pro CS3, and I copied to dll to the root, and then converted the files from .mod to .m2v, but when i tried to import i got "file not supported" i'm not sure what i have done wrong. does the dll still work? thanks
ReplyDeleteThanks for the post.
ReplyDeleteI was able to get the MOD files to open in Premiere CS3 thanks to the DLL. At first it was opening by renaming the file to either .MPG or .M2V but the audio did not work until I had the DLL loaded.
I dod have one issue. When I export my project I get RED flashes every few seconds. Has anyone else experienced this? I tried to export to DV AVI or to MOV but same issue the red flashes keep coming.
Thanks for the help
---RED PIXEL PROBLEM WHEN CONVERTING .MOD to .M2V FIX---I do not know why or how these red pixels are appearing after you convert the .mod to .m2v, BUT I can help you get rid of them so they do not ruin your footage. Not sure how well you know Premiere so hopefully I can explain it well enough. Start at beginning of the footage on the Premiere Timeline and find the red frames throughout. Start at the first one and then Zoom all the way in the timeline. Using the - and + keys will zoom in and out if you were unaware. You should notice when using the keyboards arrow keys to scroll through the footage on the timeline when zoomed in that these frames only last 1 frame. Here is what to do. Right click the video track and click ungroup. This will separate the audio and video track. Now unselect the audio so only the video track will be highlighted and effected. Go back to the red frame and use your keyboards arrow keys to go back one frame before the red flash and use the cut tool, pressing c on the keyboard will switch to this tool, and cut the video then go forward to the next frame with the keyboard arrows which should be the red frame and cut it as well. Go ahead to the end of the red and cut there as well. Now you will have 2 new pieces of video. One will be a single frame of good video and a single frame of red flash crap footage. Change back to the select tool, press v and you will go back to this tool. Delete the red frame. Copy the one single frame of good video and paste it into the empty space where the red frame was. This will create a nice transition which the eye will normally not pick up, as it is only 1 frame of video. I find using the frame after the red flash is a bit more jerky and easier to see, so I found using the previous frame is best. If you do not ungroup the video and audio when doing this you will lose audio for that section and then paste repeat audio into the timeline. Remember to ungroup always before doing this so only the video is effected. Reapeat these steps for all red frames. It is time consuming and a headache, but it will fix these problems until someone more knowledgable figures out a fix. Once all video is fixed you can select all the video on the track and the matching audio track the you originally ungrouped, right click them and Group back together. This will allow you to move it all together and edit as if it was the real footage that was not damaged by the red madness. If you still need assistance or further explantion just post it and I will see if I can explain more. Hopefully this helps
ReplyDeleteHello, does this red frame show up in every converted Mod file?
ReplyDeleteTo correct my reply or it only being a single frame effected, I was wrong. Yes it happens in every .MOD file I change to .M2V. Some are throughout just as single frames which is easy to fix just by copying previous frame and pasting, but other videos have 5 - 6 frame red pixel blasts. It make it very annoying editing video. Why and how can we stop it?
ReplyDeleteAwesome!!! THIS worked very well. :D Very good help. :)
ReplyDeletedoes the last step, the interpret footage part, only apply to widescreen footage because I've done everything else and it seems to be working but I'm wondering if I'm missing something that I'm just not aware of which yet? My footage was originally captured in standard format. Should I still interpret the footage?
ReplyDeleteIf the video aspect ratio looks incorrect, then interpreting the footage is necessary.
ReplyDeleteGreat, thanks so much. Like many on here already said, this has been an invaluable resource and helped me the footage that I needed. And thanks for responding.
ReplyDeleteThanks for this, worked with Premiere 1.5 too!
ReplyDeletethank u very much Eugene for the help i do appreciate it, but there is one problem i see red flashes every few seconds i dont know if its a codec or a video card problem please tell me if you see the flashes when you go through the process your self or do i need a video card or something.
ReplyDeleteThanks in advanced.
Eugene, thank you so much for posting.
ReplyDeleteI copy&paste the dll to the CS3 root. It works in xp box but not vista laptop. Can you pls post another dll for vista.
For info I can't get this .dll to work with CS4 either. I also tried copying the dll supplied with after effects CS4 but it didn't help.
ReplyDeleteThanks so much for this. Another way is to convert the MOD files into MPG using this little utility called SD Copy. You can then open them in Premiere but still need to do the "interpret footage" step.
ReplyDeleteBrilliant! This was so simple and straight-forward, and it worked like a charm! I will be referring your blog post to my instructors in case anyone else has the same problems. Thanks again!
ReplyDeleteThank you so so so much. I have my FS100 since october, and I had a lot of problems to upload video and convert it. Your tips has made it easier than ever.
ReplyDeleteThank you from Spain!
In reponse to fixing the red flash issue when renaming .mod to .mpg in Premier Pro (CS4):
ReplyDeleteI found that I thought I had sections where the red droput was over 5 or 6 frames but it turns out the video was in draft mode which 'blends' frames together. If you switch to highest quality then you can see the single offending frame and follow the intructions from Soderburgh above :0)
awesome dude thanks!
ReplyDeleteBIG THANK YOU!!!
ReplyDeleteAdobe Premiere pro CS3, *.mod and your information = very good resolts.
Regards MARK
:) This works! Thank you Turkov...
ReplyDeleteHi, Is URGENT! It´s works until I Export Adobe Media Encoder. In that moment a window said MISTAKE! and automatacally the programme close! I don´t understand! why? I need to make the film!! Help!
ReplyDeleteDoes anyone have an explanation for the random red flashes that appear in Premiere CS3. They appear out of nowhere and no one seems to know what causes them or how to fix them without having to delete the frame in which it occurs.
ReplyDeleteFuancionaaaa!
ReplyDeleteman I really need your help! I followed all of your instructions closely, but the only part I seem to get wrong (and is why i still get the error message) is where to post the dll file i downloaded from your post. When I go to the adobe pp folders I see one named DLL FILE and i tried pasting my .dll in it generally or in each component but it still didn't work... The files are 1)ADOBE READ ME'S, 2)DLL FILE, 3)HOSTS SET-UP, 4)SOFTWARE. What should I do?
ReplyDeletethis post really very good and effective for me thanks for sharing this nice post.
ReplyDeleteOnline Logo Design
Very useful you possess lots of understanding on this subject.
ReplyDeletePay Per Click Specialist
Very useful you possess lots of understanding on this subject. Travel Logo
ReplyDeleteIt's really beautiful work.Thanks for this kind of stuff.I mean I am totally impressed.Hope to see more updated work here.I have to say, it is very informative.
ReplyDeleteFacebook Fan Page
I've desired to write something similar to this on my webpage and this has given me a concept. Cheers. Fashion and Style
ReplyDeleteVery interesting post. I’ll be spending more time with certain areas. Well done and good luck with your work. Cheap Essay Writing
ReplyDeleteThanks for sharing helpful information, I really like your all post. I will bookmark your blog for future updates. Cheap Essay Writing
ReplyDeleteI'm using Adobe Premiere Elements 10, and the information is applicable there as well. PE10, though (being a newer program than CS3), is able to access the MOD files without renaming them. The "conform" step, though has saved me more frustration than you'll ever know! THANK YOU for taking the time to put this information out there!
ReplyDeleteFollow up note... although Premiere Elements 10 CAN use the MOD files, the quality is bad. Renaming the MOD file to an AVI file at the beginning of the process, though, followed by "getting media on the file, and then the quick Conform step, and it all works great. If you're just interested in converting MOD files to widescreen MPG files for viewing in Windows Media Player, and such, the SDCOPY utility [freely available at various download sites] does a fine job.
ReplyDeleteWowwwwwwwwwwwwwwwwwwwww! You have no idea how this tutorial has worked for me!! You are AWESOMEEEEEEEEEEEEEEEEEEEEEE!! I LOVE YOUUUUUUUUUUUUUUUUUUUUUUU :D thnx!
ReplyDeleteThank you for sharing this! Just what I’ve been searching for. Great info!
ReplyDeleteCereb
Hai..thank you for the tutorial. But, why I got the M2V files without audio in premiere ?
ReplyDeleteThank you for your help